はじめに
前回の記事では、SharePoint Framework内でWordPress REST API処理を追加し、SharePointページ内でコンテンツを表示する対応を行いました。
しかし前回の記事のままだと、取得先のWordPressのURLは、ソースコード内に埋め込まれており、変更できません。
URLを変更するためには、都度ソースコードを変更する必要があり、非常に面倒です。
そのため今回は、SharePoint Frameworkにプロパティ要素を追加し、画面から設定値を変更できるようにする機能を追加します。
今回は、「取得先のWordPressのURLを、画面から変更できるようにする対応」とします。
SharePoint Frameworkのプロパティとは
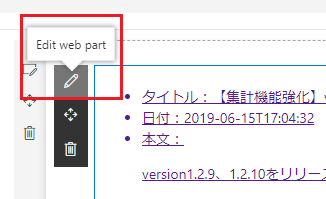
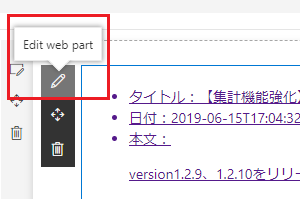
前回作成したWebパーツを起動すると、「Edit web part」と、Webパーツを編集するタイルが表示されています。

このボタンをクリックすると、画面右に、プロパティを変更する要素が表示されます。
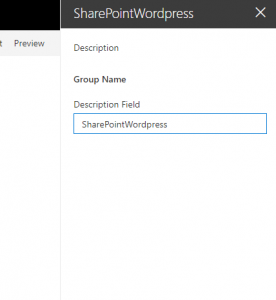
現在は「Description Field」、つまり説明文を変更する要素のみになりますが、今回はここに、取得先のWordPress APIを変更できるようにしていきます。
実装
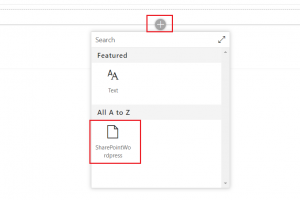
プロパティの追加
- 前回修正した、「SharePointWordpressWebPart.ts」(アプリ名.ts)ファイルを開き、先頭の以下の要素を確認します。
import {
  IPropertyPaneConfiguration,
  PropertyPaneTextField
} from '@microsoft/sp-property-pane';
この「PropertyPaneTextField」というのが、プロパティのテキストフィールドになります。
ここで、プロパティ要素にチェックボックスを追加したい場合はPropertyPaneCheckbox、ドロップダウンメニューの場合はPropertyPaneDropdownなどを追加してください。
例:
import {
  IPropertyPaneConfiguration,
  PropertyPaneTextField,
  PropertyPaneCheckbox,
  PropertyPaneDropdown
} from '@microsoft/sp-property-pane';
※今回については、種類はテキストフィールドのみなので、上記の追加は不要です
- 同じtsファイル内のインタフェース、「ISharePointWordpressWebPartProps」を確認します。デフォルトだと以下のようになっております。
export interface ISharePointWordpressWebPartProps {
  description: string;
}
ここに、プロパティとして追加したい要素と、その種類を追記していきます。
今回はWordPressのURLなので、以下のように追加してください。その後、ファイルを保存します。
export interface ISharePointWordpressWebPartProps {
  description: string;
  wordPressUrl: string;
}- その下の、getPropertyPaneConfigurationメソッドを確認します。
デフォルトだと、以下のような記述になっております。
protected getPropertyPaneConfiguration(): IPropertyPaneConfiguration {
    return {
      pages: [
        {
          header: {
            description: strings.PropertyPaneDescription
          },
          groups: [
            {
              groupName: strings.BasicGroupName,
              groupFields: [
                PropertyPaneTextField('description', {
                  label: strings.DescriptionFieldLabel
                })
              ]
            }
          ]
        }
      ]
    };
  }
これを修正し、wordPressUrl要素を追加していきます。
具体的には、以下のようになります。
protected getPropertyPaneConfiguration(): IPropertyPaneConfiguration {
    return {
      pages: [
        {
          header: {
            description: strings.PropertyPaneDescription
          },
          groups: [
            {
              groupName: strings.BasicGroupName,
              groupFields: [
                PropertyPaneTextField('description', {
                  label: strings.DescriptionFieldLabel
                }),
                // 追加-開始
                PropertyPaneTextField('wordPressUrl', {
                  label: 'WordPress URL'
                }),
                // 追加-終了
              ]
            }
          ]
        }
      ]
    };
  }
これで、SharePointWordpressWebPart.tsに関する設定は完了です。
デフォルト値の修正
アプリのプロパティ既定値を追加していきます。
- 「SharePointWordpressWebPart.manifest.json」(アプリ名.manifest.json)を開きます。
標準だと以下のような記載がされています。
  "preconfiguredEntries": [{
    "groupId": "5c03119e-3074-46fd-976b-c60198311f70", // Other
    "group": { "default": "Other" },
    "title": { "default": "SharePointWordpress" },
    "description": { "default": "SharePointWordpress description" },
    "officeFabricIconFontName": "Page",
    "properties": {
      "description": "SharePointWordpress"
    }
  }]
}- preconfiguredEntries > properties が、プロパティの既定に関する内容です。
この内容を変更します。今回は前回同等、弊社で提供しているサービスのURLにします。
(他社のブログにアクセスするのも問題なので)
  "preconfiguredEntries": [{
    "groupId": "5c03119e-3074-46fd-976b-c60198311f70", // Other
    "group": { "default": "Other" },
    "title": { "default": "SharePointWordpress" },
    "description": { "default": "SharePointWordpress description" },
    "officeFabricIconFontName": "Page",
    "properties": {
      "description": "SharePointWordpress",
      "wordPressUrl": "https://exment.net"
    }
  }]
}- Ctrl + Shift + Bでビルドを行い、以下のコマンドでWorkBenchを表示します。
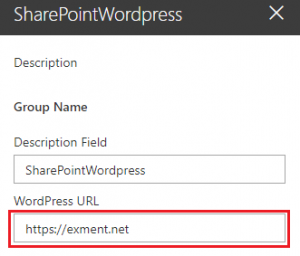
gulp serveこれで、先ほど確認したプロパティを表示すると、「WordPress URL」入力テキスト欄が追加されています。
プロパティ値をWebパーツに埋め込む
いよいよ、今回作成したプロパティwordPressUrlを、Webパーツに埋め込む処理を追加していきます。
- WordPress.tsのgetWordpressHtmlを、引数よりWordPressのURLを取得する方式に修正します。
export default class WordPress {
  public static getWordpressHtml = (wordPressUrl) => {
    var $defer = $.Deferred();
    var apiUrl = wordPressUrl + '/wp-json/wp/v2/posts?_embed';
    $.getJSON(apiUrl).then((data) => {
        // 以下省略
apiUrlを、wordPressUrl + '/wp-json/wp/v2/posts?_embed' より作成する方式に修正しました。
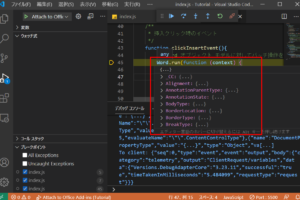
- SharePointWordpressWebPart.tsのrender関数を修正します。
public render(): void {
    var wordPressUrl = this.properties.wordPressUrl;  // ポイント
    WordPress.getWordpressHtml(wordPressUrl)
      .then((html:string) => {
        $(this.domElement).html(html);
      });
}ポイントは「this.properties.wordPressUrl」です。this.propertiesで、プロパティ値を取得できます。
今回はthis.properties.wordPressUrlで、WordPressのURLを取得しています。
これにより、WordPressのURLを、画面から取得するようになりました。
試しに、URLを変更してみます。プロパティウィンドウを開き、WordPress URLを、かつて私が書いていた個人ブログに変更します。
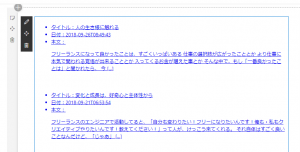
めちゃくちゃ色々語ってますねw
このように、画面からURLを変更することで、取得先のURLを変更することができます。
ちなみに、レンダリング時に直接埋め込むことも可能なようです。
参考サイトだと、以下のように記載しておりました。この中の「this.properties.description」が該当します。
public render(): void {
  this.domElement.innerHTML = `
    <div class="${ styles.helloWorld }">
      <div class="${ styles.container }">
        <div class="${ styles.row }">
          <div class="${ styles.column }">
            <span class="${ styles.title }">Welcome to SharePoint!</span>
            <p class="${ styles.subTitle }">Customize SharePoint experiences using web parts.</p>
            <p class="${ styles.description }">${escape(this.properties.description)}</p>
            <a href="https://aka.ms/spfx" class="${ styles.button }">
              <span class="${ styles.label }">Learn more</span>
            </a>
          </div>
        </div>
      </div>
    </div>`;
}
まとめ
このように、プロパティを設定することで、ユーザーによる柔軟な設定変更ができるようになります。
設定値は可能な限りプロパティ値にすることで、変化に柔軟なアプリ作りを心掛けましょう!


コメントを残す